Professional Newsletter Template

The Professional newsletter template is a one-column, fully responsive and cross-client compatible newsletter template.
It can be used with any email/newsletter software and also includes dedicated HTML files created to work flawlessly with our WordPress Newsletter plugin that has all the necessary shortcodes and tags in them so that it can plug and play.
Setting up the Professional newsletter template is quick and easy.
Video of Professional Newsletter Template
Included in the Package
The following files are included in the package:
- Photoshop (PSD) layout file
- Font (TTF) files
- Images (JPG, PNG, etc.)
- HTML version (5 different colours)
- WordPress Newsletter plugin version (5 different colours)
Installing the Newsletter Template
These installation instructions are mainly for installation and use with our WordPress Newsletter plugin to illustrate the use of shortcodes and other features.
For any other email/newsletter software, you shouldn’t have to follow any specific instructions other than just uploading the HTML file or pasting the HTML code into that software.
Adding to the Newsletter Plugin
Once you have purchased and downloaded the Professional newsletter template, extract the ZIP which contains all the included files as mentioned above.
First, you’ll want to upload all the files in the images/ folder somewhere on your server via FTP or through the WordPress media uploader accordingly since emails always pull images remotely on the clients’ side. Once you have uploaded the contents of the images/ folder somewhere, make a note of the remote, absolute URL to that folder.
Now go to Newsletters > Templates in the Newsletter plugin and click “Add New” at the top. Fill in a title, choose the index-newsletters.html file which will be uploaded. Alternatively, you can copy/paste the file’s HTML.

The newsletter template is distributed with relative image paths. So the images are src="images/logo.jpg" for example and you want them to be remote, absolute URLs like src="http://domain.com/professional/images/logo.jpg" so that all readers/subscribers can pull the images into their email clients. Eg, in this case, the prepend URL will be http://domain.com/magazine/ that will be added before images/logo.jpg for example. Now take the URL of where you uploaded the images previously and put that into the “Image Prepend URL” setting/field.
The inline styles are optional and you can apply them if you’d like for cross-client compatibility but it is up to you.
Then save your template and you’re done! If the images appear broken, you know that there is an issue with your image prepend URL or that the images weren’t uploaded correctly.
5 Different Colour Templates
The Professional newsletter template comes with 5 colour variations.
You can choose which ones you want to use and tweak the colour further to match your own branding as needed.

Using the Different Areas
The Professional newsletter template comes with several areas/elements that you can use and customize.
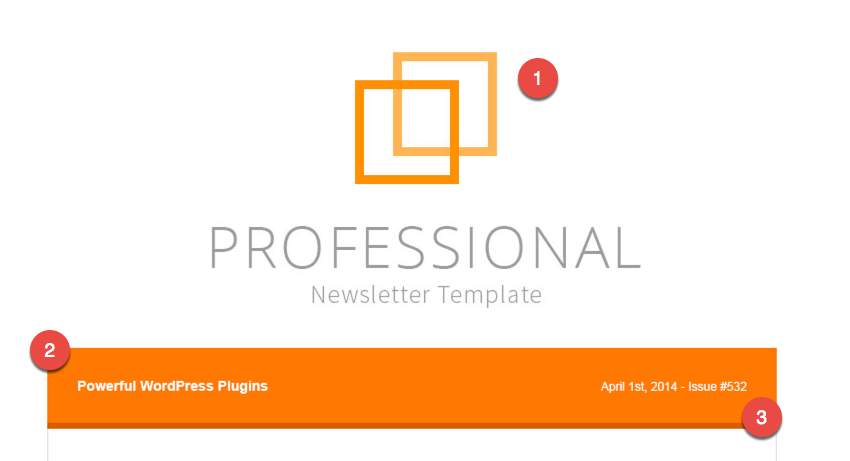
1. Logo
The main, header logo can easily be changed by going to Newsletter > Templates and editing the template to change out the logo image to your own logo as needed. There is a media uploader available to quickly upload your logo image as needed.
2. Header Description
The header description is automatically populated using your WordPress site/blog description using [newsletters_bloginfo show="description"].
3. Header Date & Newsletter ID
The current date and newsletter ID are automatically generated based on the current date and the ID of the newsletter that is being sent out. It uses [wpmldate...] and [wpml_historyid] shortcodes to output the values.

4. Main Heading
The main heading is automatically populated using the [wpmlsubject] shortcode to output the subject of the newsletter.
5. Main Content
The main content is what is typed into the main WYSIWYG editor of the Newsletters > Create Newsletter screen. This output is generated by the [wpmlcontent] tag accordingly.
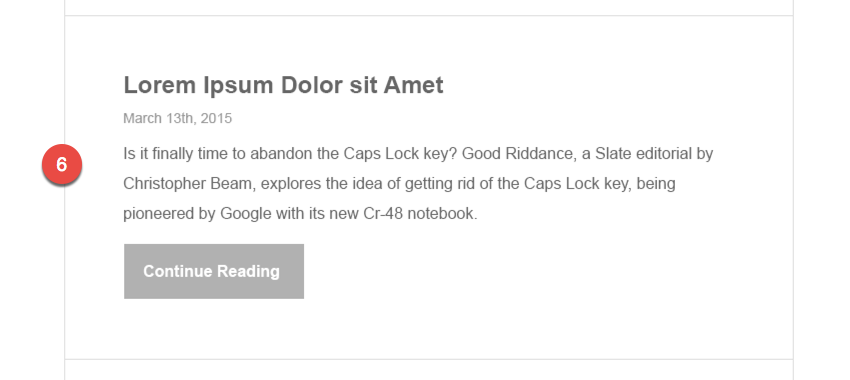
6. Content Areas
The first content area is populated by [newsletters_content id="1"]. It is also conditional so if you do not have a first content area on your newsletter, this block will not be displayed. In the same manner, up to 5 content areas are supported.
You can create an additional content area by clicking the “Add Content Area” button below the main editor. You can then insert any text, images and formatting as needed. All WordPress, Newsletter plugin and 3rd party theme and plugin shortcodes are fully supported here.

7. Footer Logo
The footer logo can be changed out with your own logo image by going to Newsletters > Templates in the plugin and editing the template to insert a new image in the place of the current one.
8. Social Network Icons
The links/URLs of the social networking icons can be changed by going to Newsletters > Templates in the plugin and editing the template to insert the relevant URLs statically for your company’s social network URLs.
9. Unsubscribe Link
The unsubscribe link is automatically generated using [wpmlunsubscribe] shortcode.
10. Company Name & Details
The company name is automatically generated using [newsletters_bloginfo show="name"] and the date using [wpmldate...].
Website & Email Hosting
Get the best website & email hosting for speed, security, and peace of mind. No restrictions. Freedom to do what you need in order to run your business.