Newsletters – Profile Builder Subscribers
![]()
WordPress Newsletter plugin – Profile Builder Subscribers
Capture email/newsletter subscribers through the Profile Builder plugin registration forms into the Newsletter plugin.
Installation
1. Make sure that you have the WordPress Newsletter plugin installed and activated.
2. Make sure that you have the Profile Builder Plugin installed and activated.
3. Get the Profile Builder extension and then download it from your downloads management section in ZIP format.
Automatic Installation
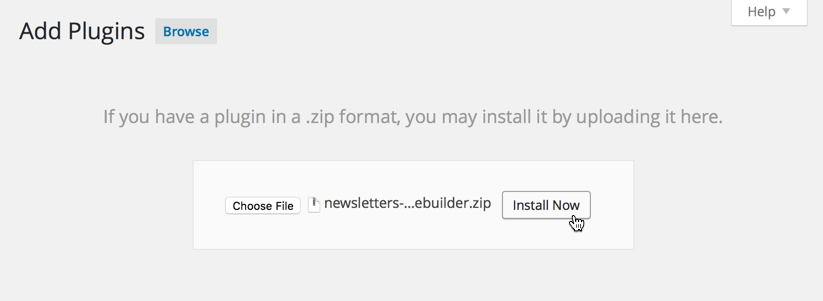
3. Go to Plugins > Add New > Upload in your WordPress dashboard where you can browse to the newsletters-profilebuilder.zip file and then click the “Install Now” button. Upon successful installation you will be given the option to activate the plugin immediately so you can click the “Activate Plugin” link and skip the upcoming activation instructions.
Manual Installation
1. Extract the ZIP archive named newsletters-profilebuilder in order to be presented with a single folder named newsletters-profilebuilder.
2. Upload the newsletters-profilebuilder folder to the wp-content/plugins/ directory of your WordPress installation, as seen in the example image below. Follow the upcoming activation instructions to activate the Newsletters-Profile Builder extension plugin.

Activation
Once you have installed the Profile Builder Subscribers extension via FTP you need to activate it.
To activate it you need to go to the normal Plugins > Installed Plugins section via your admin sidebar. There you will see the extension as a plugin listed amongst other plugins, as in the screenshot below:

Once activated you will see it listed in the Newsletters > Extensions section (via the “Newsletters” menu item in the admin sidebar), as seen in this image below:

Usage
Newsletters API Key
After activation, a new page will be created for it under Profile Builder > Newsletters.
Here, you will need to enter the Newsletter plugin API key in order to connect the add-on with the data from your account. Go the the settings page of this extension. You can access it by clicking the settings link on the plugins page or going to Profile Builder > Newsletters menu.

This API key will be pre-filled, if there’s no API key filled in, you can get it in the configuration settings, here: Newsletters > Configuration > API.
Manage Fields
If your API key is valid, your newsletter information will become available in the newsletters field when going to Profile Builder > Form Fields.

- Choose the Newsletters field
- The follow settings will affect the behaviour of the checkbox and subscription
- Field Title: This setting determines the text that will be displayed above the checkbox
- Checkbox Label: This field is simply the text that is displayed next to the checkbox to indicate it’s purpose.
- Auto Check: This setting determines whether or not the checkbox to subscribe is selected by default or not. Yes to have it selected on form load, No to require the user to check the box before submitting.
- Mailing List(s): The available checkboxes here determine which mailing lists the person will be subscribed to upon submitting the form.
Result on Front-end of your website

When users fills in the registration form with the “Subscribe me to your newsletters” checkbox checked, they will be subscribed as newsletter subscribers.
Website & Email Hosting
Get the best website & email hosting for speed, security, and peace of mind. No restrictions. Freedom to do what you need in order to run your business.