Newsletters: Mailgun API
![]()
Using Mailgun with the WordPress Newsletter plugin.
1. What is Mailgun?
Mailgun is an SMTP email relay service which allows you to send transactional emails through their API or via SMTP.
Included is tracking, bouncing, receiving of incoming emails and many other features.
2. Mailgun Setup
2.1. Add and Verify Domain
Let’s assume that you haven’t yet added and verified a domain in Mailgun to use for sending. If you have already added and verified a domain, you can skip this step.
Go to your Mailgun dashboard and click on Domains in the top menu.
Then click the “Add New Domain” button to add your domain. The domain you’ll be adding is your own domain that you’ll be sending from (the “From Address” setting in the Newsletter plugin) and also most likely the same domain that your WordPress installation is running.
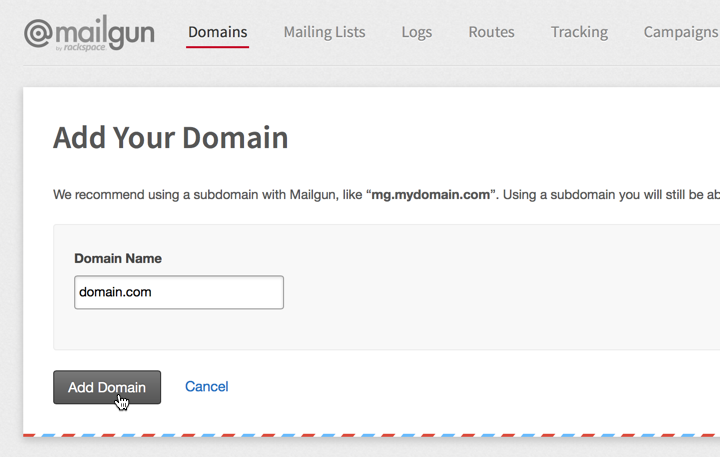
So add your domain, e.g., domain.com, and click “Add Domain” to finish.
Next, you’ll see a page which gives you several steps/instructions to follow. These steps will ask you to add several DNS records on your domain or hosting in order to verify the domain, apply DKIM (Domain Keys Identified Mail) and then also to do tracking of links in emails on your own domain name.
Follow the instructions but skip step 4 unless you actually want to use Mailgun to receive emails. In most cases you’ll want to skip this because you usually want to use Mailgun for sending emails, not receiving emails.
You’ll see that Mailgun says “Unverified” and gives the following message:
If you’ve added the DNS records correctly, scroll down a bit and click the “Check DNS Records Now” button.

That’s it, you’re done and your domain should now be verified.
3. Set up Mailgun in the Newsletter Plugin
Configure the Mailgun API under Newsletter > Configuration > General: General Mail Settings
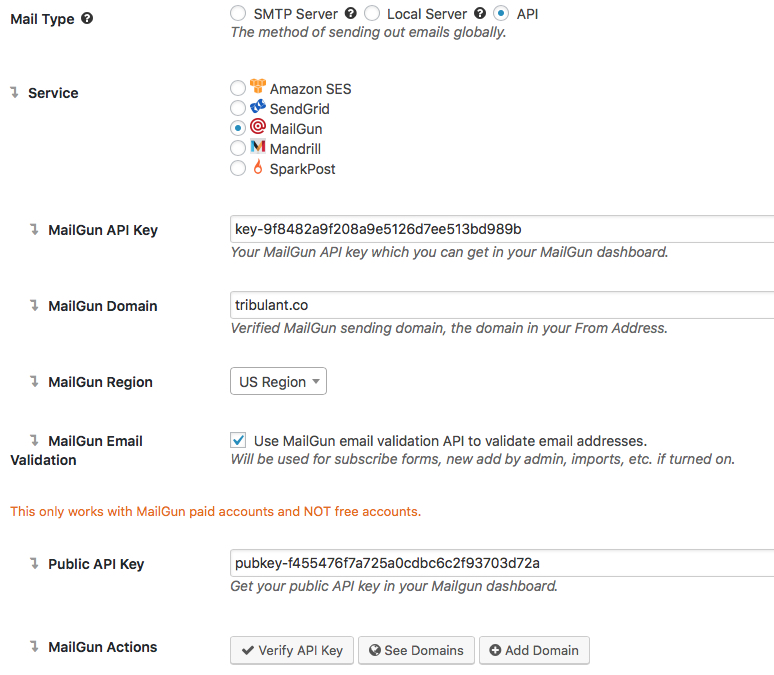
3.1. Select API as Mail Type.
3.2. Select Mailgun as API Service.
3.3. Mailgun API Key – You will find this API key in your Mailgun dashboard.
Log in to Mailgun.

Click Domains and select your domain that you want to use. You will see information about this domain. Copy and paste the API Key in the Newsletter settings.

3.4. Enter your verified Mailgun domain
3.5. Select appropriate Mailgun Region
3.6. Validate Mailgun email by ticking the “Use Mailgun email validation API to validate email address” option. Please notice this feature will work only with Mailgun paid accounts and NOT free accounts.
3.7. Get your Public API Key in your Mailgun dashboard.
3.8. Mailgun Actions- You can Verify your API key with the “Verify API Key” action.
If you want to view your verified domains click the “See Domains” action.
You can add a new domain by clicking the “Add Domain” action, it will add your Mailgun Domain (step 3.4) to your Mailgun account.
After saving, you can now click on “Test Email Settings” and send an email to your own email address. If you’re able to send and receive that test email, then you have successfully set up the Mailgun API.
Website & Email Hosting
Get the best website & email hosting for speed, security, and peace of mind. No restrictions. Freedom to do what you need in order to run your business.