Newsletter: Subscribe Forms
Newsletters > Subscribe Forms
 Newsletters > Subscribe Forms
Subscribe forms lets you create forms, each with it’s own fields, settings and purpose.
Each form can then be displayed on your WordPress website for users to subscribe.
The subscribe forms builder is extremely easy to use.
Manage Subscribe Form
Go to Newsletters > Subscribe Forms to see an overview of all subscribe forms. You can add a new form or manage forms in this section of the plugin.

1.) Add New
Add a new Subscribe form by clicking the Add New button. It will open an overview with the form builder to add a new form. (See below more details for adding a form)
2.) Bulk Actions
Apply bulk actions by selected subscribe forms. The only bulk action available at this moment is delete.
3.) Search Forms
Search for a form in the search field provided.
4.) Title
The name/ title of the subscribe forms.
5.) Shortcode
Each form get a shortcode. You can use this shortcode anywhere on your site to show the subscribe form. e.g., "[[newsletters_subscribe form=11]]"
6.) Subscriptions
This column show the number of subscriptions per form. If you click on the number an overview with subscribers will open. You can manage subscribers in this section per form.

Add a New Form
Newsletters > Subscribe Form – Add new

click to enlarge
1.) Form Builder
A drag and drop form builder to add and remove fields for your form.
2.) Settings
General Settings

Add button text, enable Ajax, and CAPTCHA for this form under general settings.
Confirmation Settings

Set confirmation type – Message or Redirect link to show after successfully subscribed on the form.
Emails Settings

Write the custom email message the subscribers will receive upon subscription or leave blank to use system default.
Styling settings (Form Styling, Field Styling, Button Styling, Custom HTML, Custom CSS)
Form Styling

1. Layout
Choose between a normal or Inline/Horizontal subscription form layout.
2. Two Columns inside Posts/Pages
Tick the “Yes, display two columns inside posts/pages” checkbox to display two columns instead of one inside posts/pages.
3. Form Padding
Set the subscription form padding.
4. Text Color
Select subscription form text color.
5. Background color
Select subscription form background color.
6. Loading indicator?
Tick the “Yes, show the loading indicator on Ajax calls” to enable this option.
7. Loading icon
Choose desired loading icon.
8. Loading color
Set the loading color.
Field Styling

1. Color
Set the color of the subscription form field.
2. Text Color
Set the field text color.
3. Border Radius
Set the field border radius.
4. Show Label?
Tick the “Yes, show the label for each field” option if you want to show the field labels.
5. Label color
Set the field label color.
6. Show captions
Tick the “Yes, show the captions bellow the fields.
7. Caption color
Set the caption color.
8. Show errors
Tick “Yes, show the error messages bellow fields on validation” option to show errors bellow the fields.
9. Error color
Set the error color.
Button styling

1. Color
Set the button color.
2. Text Color
Set the button color.
3. Border Size
Set the button border size.
4. Border Radius
Set the button border radius.
5. Border Color
Set the button border color.
6. Hover Color
Set the button hover color.
7. Hover Border Color
Set the button border color.
Custom HTML

Fill in your custom HTML code for the subscription form.
Custom CSS

Fill in your custom CSS code for the subscription form.
You can get a live preview of all your subscription form settings at any time by hitting the Preview button in the right upper corner of the settings screen.
3.) Preview
Preview the form – it will show the exact preview on how the form will look on the front end of the website.

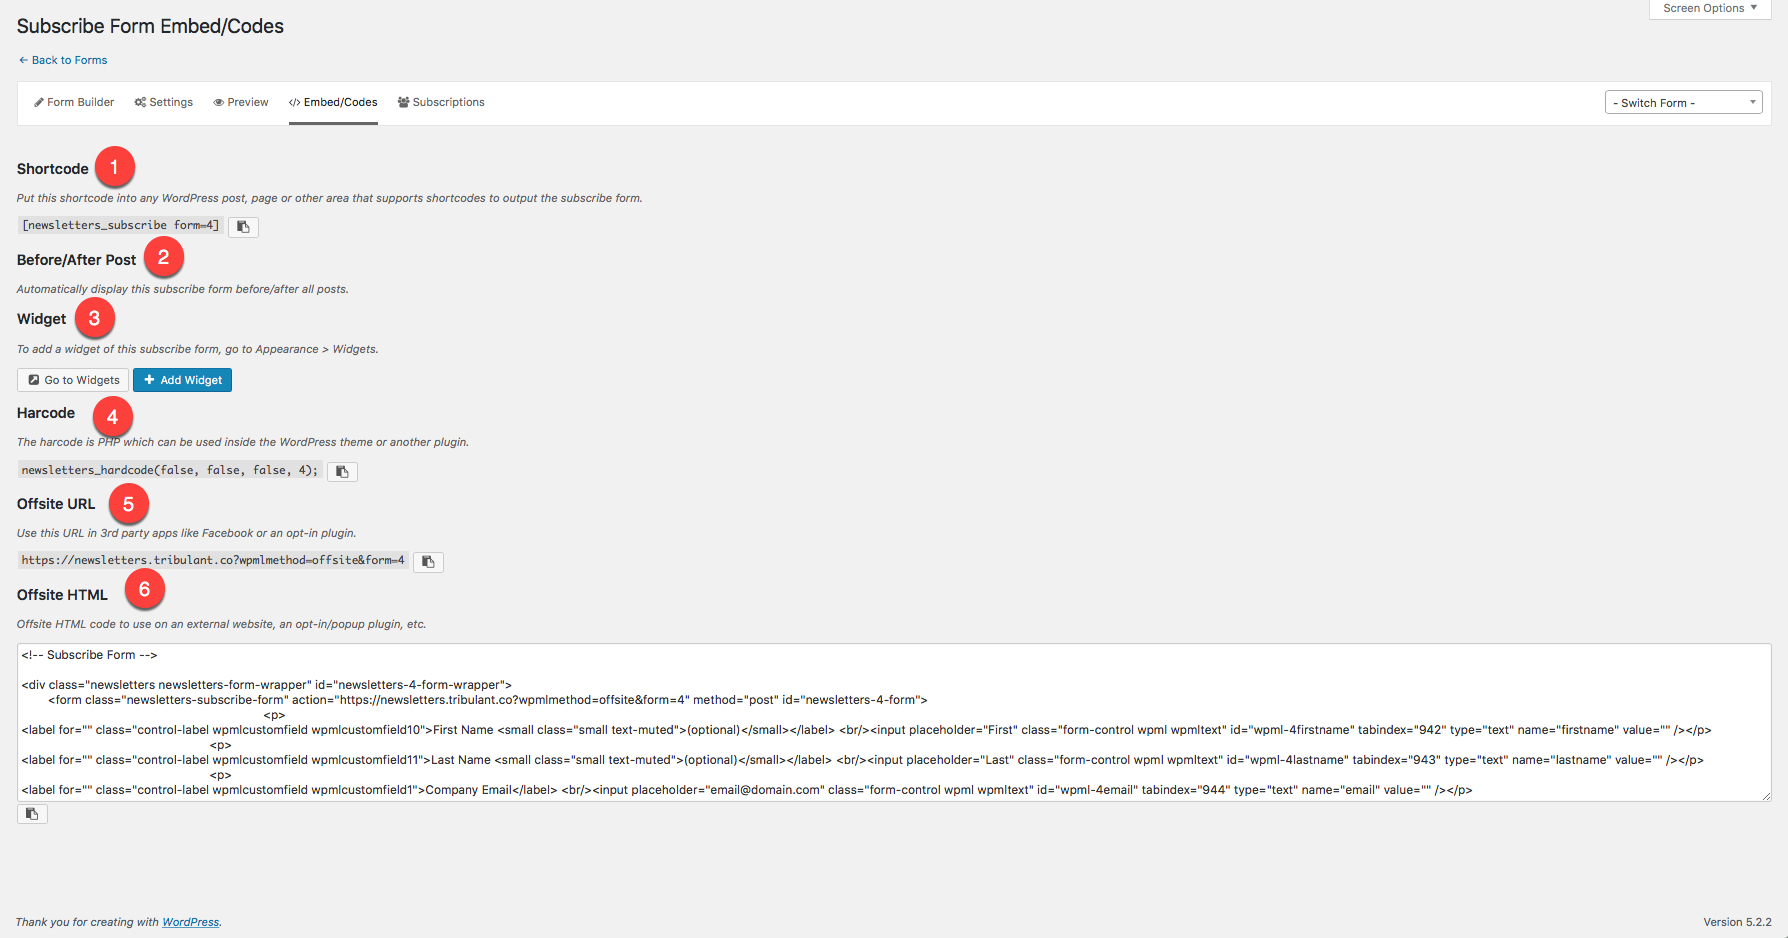
4.) Embed/Codes
click to enlarge
1. Shortcode
Put that shortcode on a post, page or any other area that supports shortcodes to output the subscribe form.
2. Before/After Post
Automatically display this subscribe form before/after all posts.
3. Widget
Go to Appearance>Widgets to add a widget of this subscribe form.
4. Hardcode
You can use this PHP code inside a theme or another plugin.
5. Offsite URL
Use this URL in 3rd party applications like Facebook or an opt-in plugin.
6. Offsite HTML
Copy this HTML code and use it on an external website, an opt-in/popup plugin, etc.
5.) Subscriptions
In this section it will show a manage subscription screen where you can manage all subscription per form.
6.) Switch Form
Switch to one of your other forms by clicking on it in the dropdown menu provided.
7.) Form Name
Add a name / title for your form.
8.) Shortcode
A shortcode for each form will be generated automatically. Use this shortcode on any page on your website to show this form. e.g., [[newsletters_subscribe form=11]]
9.) Use two columns inside posts/pages
Tick this option on/off to see the subscribe columns in one or two columns inside posts/pages. You will notice changes directly in form builder.
10.) Form Fields
The current fields in your form. You can drag more fields from section 9 to this section and reorder them by drop and drag. Mailing list and email is required for each form.
11.) Custom Fields
Drag and drop these fields to the form builder. These fields can be created under Newsletters > Custom Fields.
12.) Save
Save the form after building it with the form builder.
Configure a field
Configure a field in the form builder, by clicking the arrow to expand the box.
It’s basic details of the custom field. It will automatically use the settings per field specified when creating the field under Newsletters > Custom Fields.
You can manually change each setting per field by filling it in the fields provided in the expanded box.
Below an example of a text field (First Name)

Video
Watch the video of subscribe forms
Beautiful Newsletter Templates
Professional newsletter templates that are fully responsive for desktop, tablet, and mobile. They are 100% cross-client compatible.