Newsletters – Convert Plus
![]()
WordPress Newsletter plugin : Convert Plus extension plugin
With this extension plugin you can connect the Convert Plus plugin with the Newsletter plugin easily. You can connect the Newsletter plugin as a campaign under Convert Plus > Connects and then start capturing newsletter subscribers in your Convert Plus plugin popups/opt-ins.
Installation
- Make sure that you have the WordPress Newsletter plugin and WordPress Convert Plus plugin installed AND ACTIVATED.
- Download the Newsletters – Convert Plus in a ZIP archive.
Automatic Installation
3. Go to Plugins > Add New > Upload in your WordPress dashboard where you can browse to the newsletters-convertplus.zip file and then click the “Install Now” button. Upon successful installation you will be given the option to activate the plugin immediately so you can click the “Activate Plugin” link and skip the upcoming activation instructions.

Manual Installation
3. Extract the ZIP archive named newsletters-convertplus.zip in order to be presented with a single folder named newsletters-convertplus.
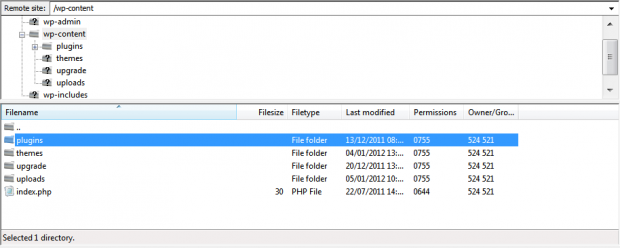
4. Upload the newsletters-convertplus folder to the wp-content/plugins/ directory of your WordPress installation, as seen in the example image below. Follow the upcoming activation instructions to activate the Newsletters – Convert Plus Subscribers extension plugin.
Activation
Once you have installed the Newsletters – Convert Plus Subscribers extension via FTP you need to activate it.
To activate it you need to go to the normal Plugins > Installed Plugins section via your admin sidebar. There you will see the extension as a plugin listed amongst other plugins. Go ahead and activate it to start using it.
Usage
Follow these steps to connect the Newsletter plugin with Convert Plus plugin using this extension:
1. Convert Plus Campaign

Animated illustration to show how to create a campaign
Go to Convert Plus > Connects and then click “Create New Campaign” to create a campaign.
Fill in a campaign name and then choose “Tribulant Newsletters” as the third party software and click “Next“.
Your mailing list/s from the Newsletter plugin will now show up so that you can choose a list and then click “Create Campaign“.
2. Convert Plus Modal Popup

Animated illustration shows how to create a modal popup
With your campaign created as illustrated above you can start adding modal popups.
Go to Convert Plus > Modal Popup and click “Create New Modal“.
Choose your design/style and then click “Use This” to go to the modal designer of Convert Plus.
In the modal designer on the left-hand side, go to “Submission” and choose the campaign you created in the drop down under “Collect Leads Using” setting.
Configure the modal further as needed then save and publish it.
3. The Result

Animation to show the result of Convert Plus + Newsletter Plugin
As a result you now have a modal popup/opt-in which saves email subscribers to the Newsletter plugin.
You can create multiple campaigns and multiple popups this way for different lists and purposes.
Video
Watch the installation and usage video of Convert Plus plugin with the Newsletter plugin:
Beautiful Newsletter Templates
Professional newsletter templates that are fully responsive for desktop, tablet, and mobile. They are 100% cross-client compatible.