Newsletter: Manage Autoresponders
Filter Autoresponders
![]()
Filter autoresponders according to mailing list and status to have more control over them.
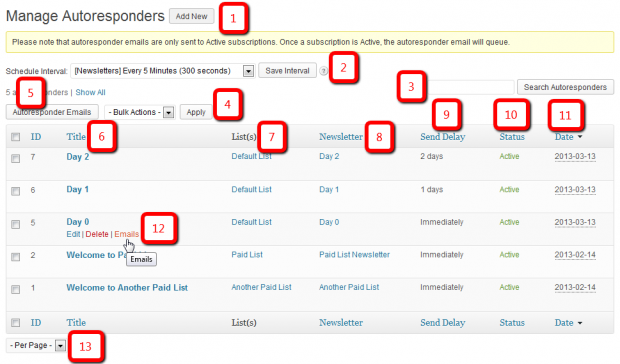
1. Add New
You can Click on the “add new” button to create a new autoresponder which you can schedule to send a newsletter to new subscribers.
2. Schedule Interval
Here you can schedule the interval in which you would like an autoresponder to be sent out to subscribers/users.
3. Search Autoresponders
If you have many autoresponders and your looking for one specific autoresponder, then you can use this search function to find autoresponders by title.
4. Bulk Actions
Apply bulk actions such as Delete, Activate and Deactivate on the selected/checked autoresponders in the table of autoresponders below.
5.Autoresponder Emails
Clicking this button will take you through to the “Autoresponder Emails” section where you can see a history of all autoresponder emails. It will show the autoresponder emails which have been sent and the ones which are yet to be sent. See the Autoresponder Emails documentation: https://tribulant.com/docs/wordpress-mailing-list-plugin/5118
6. Title
This shows the title of the all the autoresponders you have on your list of autoresponders you have created.
7. List(s)
The list(s) to which this autoresponder links to. Subscribers subscribing to these mailing lists will be queued to receive this autoresponder.
8. Newsletter
This will be the email the all your selected subscribers will receive once your email has been sent out.
9. Send Delay
The “send delay” works along with the “schedule interval” . It shows the status of the delay in which the autoresponder will be sent out to your subscribers.
10. Status
The status of each autoresponder can either be Active or Inactive. An Active autoresponder means that it is active and working and will send emails to subscribers as per it’s conditions. When an autoresponder is Inactive it is not in a working state and will not log any autoresponder emails for subscriptions by subscribers.
11. Date
This shows the date in which you created your autoresponder.
12. Actions
Here you can hover over your autoresponder that you have created to delete or edit it like needed. The “Emails” link allows you to quickly view the autoresponder emails of that specific autoresponder.
13. Per Page
You can choose how many autoresponders you would like to see per page in this table.
Beautiful Newsletter Templates
Professional newsletter templates that are fully responsive for desktop, tablet, and mobile. They are 100% cross-client compatible.


