Newsletters: Import Subscribers From CSV Spreadsheet
Import Subscribers from a CSV file into the WordPress Newsletter plugin.
You can quickly and easily import a CSV spreadsheet from any source at all into the WordPress Newsletter plugin as subscribers to a specified mailing list and start sending these subscribers newsletters.
Go to the Newsletters > Subscribers > Import/Export section of the WordPress Newsletter plugin.
Browse to your CSV spreadsheet which you would like to import into the mailing list database. Select the mailing list to which the imported subscribers should be assigned to. Then check the “CSV Spreadsheet” radio button which will display some new options.

1. File Type
There is the option to choose to import either CSV Spreadsheet or a Mac OS Address Book. In this case we are selecting a CSV file as shown in the screenshot above.
2. File Browser
Click the “Browse” button and navigate in the pop-up window to the CSV file you are wanting to import. Find the file and click “Open” you’ll see part of the location in the blank box once you have selected a file.
3. Preview of File
By default, everyone will see the email address field as it is essential to having a subscriber. You’ll also see the “Mailing List(s)” field by default, this allows you to specify a mailing list name to import subscribers to, also allowing you to create a mailing list where it isn’t available. This mailing list import will overwrite the selection initially.
However, if you have added additional fields in Newsletters > Custom Fields section, then you can import subscribers with those additional fields as well. It will show all columns in your CSV file and you can map them with your custom fields.
It is important to map the columns with both the default and custom fields or the import will fail.
4. Delimiter
The delimiter is the character that you have used to separate the fields in your CSV file. Most people using Microsoft Excel should leave it as a comma (the default value) to ensure that when the CSV file is saved as CSV (Comma Delimited), things go smoothly. If you encounter any issues importing, THIS is the most likely cause.

5. Mailing Lists
This will show all your current mailing lists as checkbox options. Select the mailing list(s) that you want to import the subscribers in the CSV to. Note that multiple mailing lists can be selected.
6. Require Activation
Would you like to send an activation/confirmation email to each subscriber to activate their subscription?
You will be able to specify a Confirmation Email with the Require Activation option turned on.

7. Update/Overwrite Subscriber
Update and Overwrite current subscriptions.
If you have a CSV file with empty values in it, those empty values will not overwrite existing values on those custom fields for subscribers. The existing value on a custom field will rather be kept instead of overwriting with an empty value.
8. Bounce/Unsubscribes
The system will check each subscriber and if they bounced/unsubscribed, they will not be imported.
9. Show Progress
This is best explained by viewing the next tab in this section During the Import. Setting this option to ‘No‘ means that the import will be done in a page refresh (and you might have to click the Run Now button after the refresh). Depending on the size of the file, the page may be unresponsive for some time.
Setting this to ‘Yes‘ will display the nice visual progress as mentioned. It will use an AJAX import and you can see the subscribers which import and which fail.
10. Import Subscribers
Once you have configured everything, simply click the big blue button that says “Import Subscribers” and allow some time for import depending on the amount of subscribers in the CSV file.
For piece of mind you can monitor your import to see how well it does. Note that this is not shown if you set ‘No‘ for option 6 “Show Progress” when preparing the import. As seen from the image below, there is a simple visual progress bar and a list of successful and failed imports. This screen can essentially be left in it’s own tab/window while you continue other things on your site, it’s been coded at a certain import interval as to not overload any one’s server. Remember you can pause the import at anytime if needed.
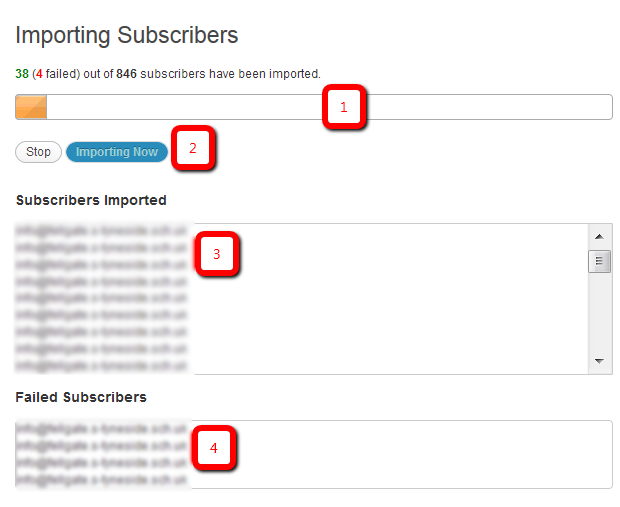
1. Progress Bar
This bar shows the progress of the current import. The more full the bar the further along the import is to finishing. Note above the bar it gives you the import stats in a numerical form as well “38 (4 failed) out of 846”.
2. Stop/resume Buttons
If at anytime you need to stop the import, clicking the “Stop” button will pause the import. Later on you can just resume the import by clicking the blue “Resume Import” button which takes place of the blue “Importing Now” button. Resuming will pick up where you left off.
3. Subscribers Imported
This is a simple list really, as a subscriber is added to your newsletter plugin from the CSV they will be listed in the box there.
4. Subscribers Failed
This is actually almost the same as the “subscribers import” .When subscriber imports fails it will show in the list there, sometimes with an error to indicate why it has failed. Most of the time it will be because of the email address having odd characters and is therefore not valid to add as a subscriber.
Troubleshooting
- If you are attempting to import birth dates for subscribers and it imports different dates, Excel might be changing the format of the cell, thus causing the dates to be different than the original ones. Right click on the birth date cells in Excel and click on Format Cells. Choose a format similar to this: “13-Jun-21” and attempt the import once more.
- If the import does not function and then fails, make sure that you have mapped the columns to the fields. See “Preview of File” section above.
Website & Email Hosting
Get the best website & email hosting for speed, security, and peace of mind. No restrictions. Freedom to do what you need in order to run your business.