Newsletters -Digital Access Pass

WordPress Newsletter plugin : Newsletters – DAP
With this extension plugin you can capture subscriber details for your WordPress Newsletter Plugin from the Digital Access Pass platform.
Installation
1. Make sure that you have the WordPress Newsletter plugin installed AND ACTIVATED.
2. Make sure you have an account with DAP.
3. Purchase the Newsletters – DAP extension and then download it from your downloads management section in ZIP format.
Automatic Installation
3. Go to Plugins > Add New > Upload in your WordPress dashboard where you can browse to the newsletters-dap.zip file and then click the “Install Now” button. Upon successful installation you will be given the option to activate the plugin immediately so you can click the “Activate Plugin” link and skip the upcoming activation instructions.

Manual Installation
1. Extract the ZIP archive named newsletters-dap.zip in order to be presented with a single folder named newsletters-dap.
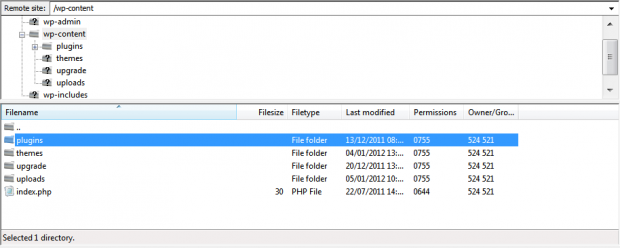
2. Upload the newsletters-dap folder to the wp-content/plugins/ directory of your WordPress installation, as seen in the example image below. Follow the upcoming activation instructions to activate the Newsletters-dap extension plugin.

Activation
Once you have installed the Newsletters- DAP extension via FTP you need to activate it.
To activate it you need to go to the normal Plugins > Installed Plugins section via your admin sidebar. There you will see the extension as a plugin listed amongst other plugins, as in the screenshot below:
Before Activation

After Activation

Once activated you will see it listed in the Newsletters > Extensions section (via the “Newsletters” menu item in the admin sidebar), as seen in this image below:

DAP Setup
DAP has a 3rd Party Notification Email IDs setting which you’ll find when you edit a product under “Products”.
You’ll create a dedicated mailbox and fill it’s email address into this setting and save the product. You can do this on multiple products.
In the next tab of this documentation, you will setup a POP3 connection to this mailbox so that the DAP extension plugin grabs the DAP notification emails for processing and adding to the Newsletter plugin automatically.

1.) Go to Products/Levels in the DAP Menu
2.) Click on the notifications tab
3.) Select your product in the dropdown menu
4.) Insert your 3rd- Party Notification Email ID.
Plugin Settings
DAP extension settings:
Newsletters > Extensions > Settings

1. Integration
Enable or disable integration with DAP.
2. Incoming Mail Server Settings
This settings will periodically check for incoming emails. You have options to run schedule now or manually add a schedule for the server to run.
3. Notification Email
Specify the email address to which DAP sends 3rd party notifications for new user signups. The same email address used in the DAP notification settings above.
4. Incoming Server
Your incoming server settings, which includes incoming server, username, password and port.
5. Delete Emails
Select Yes if you want the email messages to be deleted from the mailbox after processing and No if you want the emails to remain in the mailbox.

6. Custom Fields Settings
Configure each field in the notification email which you want to capture to the subscriber.
7. Mailing List Settings
Here you can specify which product buyers should subscribe to which mailing list.
Release Notes
Beautiful Newsletter Templates
Professional newsletter templates that are fully responsive for desktop, tablet, and mobile. They are 100% cross-client compatible.

