Newsletters – Google Analytics

WordPress Newsletter plugin : Google Analytics
It adds Google Analytics tracking code for you if you don’t already have it added to your site and it also allows you to track custom sources and campaigns in Google Analytics for all links inside your newsletters.
Our Google Analytics plugin supports the following:
Google Analytics 4 (GA4): Tracking ID or customizable Google tag.
Universal Analytics (GA3): Tracking ID.
Installation
1. Make sure that you have the WordPress Newsletter plugin installed AND ACTIVATED.
2. Get the Google Analytics extension for free and then download it from your downloads management section in ZIP format.
Automatic Installation
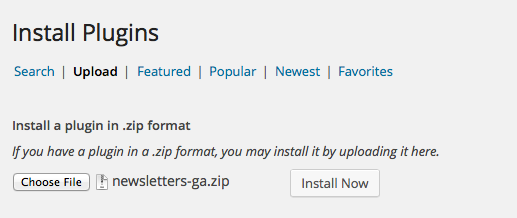
3. Go to Plugins > Add New > Upload in your WordPress dashboard where you can browse to the newsletters-ga.zip file and then click the “Install Now” button. Upon successful installation, you will be given the option to activate the plugin immediately by clicking the “Activate Plugin” link and skip the upcoming activation instructions.
Manual Installation
1. Extract the ZIP archive named newsletters-ga.zip in order to be presented with a single folder named newsletters-ga.
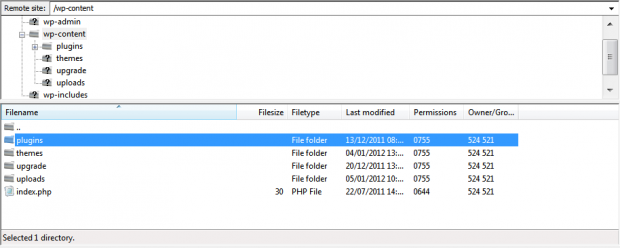
2. Upload the newsletters-ga folder to the wp-content/plugins/ directory of your WordPress installation, as seen in the example image below. Follow the upcoming activation instructions to activate the Newsletters-ga extension plugin.
Activation
Once you have installed the Google Analytics extension via FTP you need to activate it.
To activate it you need to go to the normal Plugins > Installed Plugins section via your admin sidebar. There you will see the extension as a plugin listed amongst other plugins, as in the screenshot below:

Once activated you will see it listed in the Newsletters > Extensions section (via the “Newsletters” menu item in the admin sidebar), as seen in this image below:

Plugin Settings
Google Analytics extension settings:
Newsletters > Extensions > Settings

1. Add Tracking Code
If you do not already have Google Analytics tracking code on your site, tick/check this to add it.
2. Campaign Always Active
Ticking this box will enable the “Create Google Analytics custom campaign for this newsletter” by default on the create/edit newsletter page, so that you do not have to tick/check it each time.
3. Google Analytics version
Choose the version you’d like to use. Universal Analytics (UA – GA3) is no longer supported. We suggest using Google Analytics 4.
4. Google Analytics Account OR Google tag embed type
Log in to your Google Analytics account.
Add your Google Analytics property tracking ID or a customizable Google tag. Obtain it from Google Analytics tracking code page.
Usage
By creating a newsletter you can setup a custom campaign per Newsletter.
Newsletter > Create Newsletter

1. Custom Campaign
Tick this box to create a Google Analytics custom campaign for the newsletter. The first 5 are for both Universal Analytics (GA3) and Google Analytics 4.
UTM Source
utm_source. This UTM source identifies the newsletter that is sending traffic to your site.
UTM Medium
utm_medium. Set an advertising or marketing medium, it’s recommended that you set this to “email”.
UTM Campaign
utm_campaign. Set an individual campaign name, slogan, promo code etc., for a product or service.
UTM Term
utm_term. If you are manually tagging paid keyword campaigns, you should also use utm_term to specify the keyword.
UTM Content
utm_content. Used to differentiate similar content, or links within the same ad. For example, if you have two call-to-action links within the same email message, you can use utm_content and set different values for each so you can tell which version is more effective.
The below are for Google Analytics 4.
UTM Campaign ID
utm_id. Campaign ID. Used to identify a specific campaign or promotion. This is a required key for GA4 data import. Use the same IDs that you use when uploading campaign cost data.
UTM Source Platform
utm_source_platform. The platform responsible for directing traffic to a given Analytics property (such as a buying platform that sets budgets and targeting criteria or a platform that manages organic traffic data). For example: Search Ads 360 or Display & Video 360.
UTM Creative Format
utm_creative_format. Type of creative, for example: display, native, video, search.
UTM Marketing Tactic
utm_marketing_tactic. Targeting criteria applied to a campaign, for example: remarketing, prospecting.
After setting up a custom campaign, links will now have the Google Analytics query arguments/values added to them, e.g., https://example.com/subscribe/?utm_source=ganewsletter&utm_medium=email&utm_campaign=googleanalytics
As a result, someone clicks the link and goes to your site. The Google Analytics tracking code picks up the parameters in the URL and logs them to your Google Analytics automatically.
To read more about custom campaigns, please read this. https://support.google.com/analytics/answer/10917952?hl=en
View GA Reporting
After processing, the following campaign and traffic source dimensions and metrics will be available in reports.
https://support.google.com/analytics/answer/6205762?hl=en#reporting

Release Notes
Beautiful Newsletter Templates
Professional newsletter templates that are fully responsive for desktop, tablet, and mobile. They are 100% cross-client compatible.