Checkout: BluePay 2.0 (Redirect)
WordPress Shopping Cart plugin: BluePay 2.0 Redirect (bp10emu)
Requirements
The BluePay 2.0 Redirect extension plugin has the following requirements:
- WordPress Shopping Cart plugin.
- BluePay account.
Installation
1. Make sure that you have the WordPress Shopping Cart plugin installed and that you have purchased the BluePay 2.0 extension.
2. Download BluePay 2.0 extension from the downloads management section in a ZIP archive (you may need to login to your Tribulant Software account in order to access your download).
3. Extract the ZIP archive named checkout-bluepay.zip in order to be presented with a single folder named checkout-bluepay.
4. Upload the checkout-bluepay folder to the wp-content/plugins/ directory of your WordPress installation, like seen in the example image below.

Activation
Once you have installed the BluePay 2.0 Redirect extension via FTP you need to activate it.
To activate it you need to go to the normal Plugins > Installed Plugins section via your admin sidebar. There you will see the extension as a plugin listed amongst other plugins, look at the screenshot below.

Once you activate the plugin, then in “Checkout > Extensions” section, the BluePay 2.0 Redirect Payment Gateway is now available to be activated. When you hover it a red “Activate” will appear, once activated the red message on the right becomes green text stating “Installed and Activated“. The BluePay 2.0 Redirect extension is now available in the “Checkout > Configuration > Payment Methods” section.

Configuration
To configure the BluePay 2.0 extension to work on your site and make payments to your account you need to go to “Checkout > Configuration > Payment Methods” section. In the Payment Methods tab you will see many options listed here, scroll until you find the “BluePay 2.0 Redirect” option as seen in the screenshot below. Fill out the fields accordingly. Don’t forget to select the checkbox for BluePay in the scroll box on the far right and save the configuration when you’re done.

1. Title/Caption
Specify a title/caption here which will be used to display this payment method to your customers on the front-end of your shop such as on the billing page, orders history and other sections.
2. Merchant
Fill in your BluePay Merchant ID which was provided to you by BluePay when you received the account. If you are not sure about this field, please contact BluePay for assistance.
3. Secret Key
Fill in your BluePay Secret Key which was provided to you by BluePay when you received the account. If you are not sure about this field, please contact BluePay for assistance.
4. Mode
This is simply the connection mode to distinguish between a live/production and test/staging account. the Test option is essentially the exact same thing as the Live option, bar the fact that transactions made in Test mode are not actually processed, meaning no actual money is involved.
Recurring Payments
You can use the BluePay extension plugin with your Shopping Cart plugin to have recurring payments on your WordPress website. Everything is built in and easy to setup. It is also fully automatic, logging payments as they reoccur.
Configure BluePay recurring
The first thing you need to do is to configure your BluePay account to notify the Shopping Cart plugin when a recurring payment is made so that the plugin can automatically log recurring payments accordingly on each order.
Go to your BluePay panel and then go to Admin > Accounts > List to see the accounts. For the specific account that you’re using for the site, click on it’s name to view and then on the next screen, click “Edit“.
Under “Email Settings“, you’ll see a setting named “Rebilling POST URL” which you need to fill in. The URL is your shopping cart page URL with ?wpcomethod=recurring&type=bluepay added to the end of it. So if your shopping cart page URL is http://domain.com/shop/shopping-cart/ the URL to fill into the setting is http://domain.com/shop/shopping-cart/?wpcomethod=recurring&type=bluepay
That’s it, you can save the account settings in BluePay. As a result, each time a reoccuring sale takes place automatically, it will post the data to your server and the Shopping Cart plugin, resulting in the plugin logging a payment on the order.
Create a recurring product
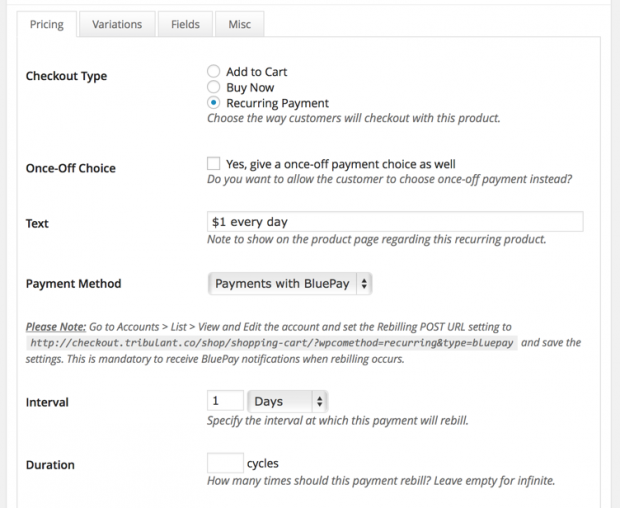
To create a recurring product, go to Checkout > Products and click “Add New” at the top.
For the “Checkout Type“, choose “Recurring Payment” and you will see that the recurring options become available.
Choose your BluePay payment method in the “Payment Method” setting which will make the BluePay specific recurring options/settings available so that you can choose the interval at which the payment for the product should reoccur and also the duration. You can leave the duration empty for infinite cycles.
Receive recurring payments using BluePay
That’s it, you’re done. Your customers can now purchase your recurring product using BluePay and be billed automatically at the interval you specified.
Releases
Beautiful Newsletter Templates
Professional newsletter templates that are fully responsive for desktop, tablet, and mobile. They are 100% cross-client compatible.


