Checkout – Virtual Card Services

WordPress Shopping Cart plugin : Virtual Card Services extension
Using this extension plugin with the Shopping Card plugin you can apply the South African Virtual Card Services payment method to your website.
Installation
1. Make sure that you have the WordPress Shopping Cart plugin installed.
2. Download the Virtual Card Services extension in a ZIP archive (you may need to login to your Tribulant Software account in order to access your download).
Automatic Installation
3. Go to Plugins > Add New > Upload in your WordPress dashboard where you can browse to the checkout-vcs.zip file and then click the “Install Now” button. Upon successful installation you will be given the option to activate the plugin immediately so you can click the “Activate Plugin” link and skip the upcoming activation instructions.

Manual Installation
3. Extract the ZIP archive named checkout-vcs.zipcheckout-vcs.
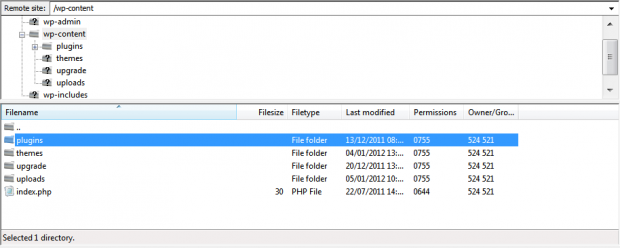
4. Upload the checkout-vcs folder to the wp-content/plugins/ directory of your WordPress installation, as seen in the example image below. Follow the upcoming activation instructions to activate the Newsletters Subscribers extension plugin.

Activation
Once you have installed the Virtual Card Services extension via FTP you need to activate it.
To activate it you need to go to the normal Plugins > Installed Plugins section via your admin sidebar. There you will see the extension as a plugin listed amongst other plugins, as in the screenshots below:
Before Activation

After Activation

Once activated you will see it listed in the Checkout > Extensions section (via the “Checkout” menu item in the admin sidebar), as seen in this image below:

Virtual Card Services Setup
With the Virtual Card Services extension plugin installed and activated, you can now make a few changes to your Virtual Terminal for the process to work as expected.

Go to “Merchant Administration” and choose “VCS Interfacing (Page 1)” from the select drop down menu which will make some settings available.
In the “Approved Page URL” and “Declined Page URL” simply fill in the link/URL to your Shopping Cart page on your site, for example: http://domain.com/shop/shopping-cart/ .
That’s all you have to do. The “Callback Settings” (no 6) under “Merchant Administration” can be left blank.
Configuration
Configuring the Virtual Card Services extension plugin is very simple. All configuration is done under Checkout > Configuration > Payment Methods. Once on that page, scroll down to Virtual Card Services, where you’ll see the configuration options as in the example below. You can then configure the payment method according to your Virtual Card Services account details:

1. Title/Caption
This will be the title/name of your payment method that will be seen by your customers.
2. VCS Terminal ID
Enter your VCS Terminal ID provided by Virtual Card services here.
3. MD5 Hashing
Turn on or off the MD5 hash security feature provided by VCS.
4. MD5 Key (Secret Word)
Enter the MD5 key (secret word) provided by VCS for hashing here. Ask VCS for this MD5 key/secret word to fill in here. They may need to set it on your account.
5. Settlement
Determine whether settlement of payment should be delayed, i.e. processed manually later, or immediate and automatic following the transaction.
6. Virtual Message
This is only to be turned on if you are a user of Vitual Card Services’ Vitual Message feature.
How it Works
1. A customer accesses you online store and adds one or more products to his shopping cart.
2. He decides to check out and goes through the Shopping Cart plugin’s checkout process.
3. When it comes to payment, he is redirected to a secure page at Virtual Card Services:

4. Upon successful processing of the customer’s payment, he is redirected back to your website for completion of the transaction.
Releases
- 1.1 - November 13, 2014
Beautiful Newsletter Templates
Professional newsletter templates that are fully responsive for desktop, tablet, and mobile. They are 100% cross-client compatible.

