Checkout – eWAY Rapid API
![]()
eWAY Rapid API extension for the WordPress Shopping Cart plugin
eWAY’s Rapid 3.1 API is our all-in-one solution with advanced fraud prevention, transparent redirect and direct connection. Create perfectly rendered payment pages on all devices, including customised themes, anti-fraud and verification tools and more.
Installation
1. Make sure you have WordPress and the WordPress Shopping Cart plugin installed.
2. Purchase the eWAY Rapid API extension and then download it from your downloads management section in ZIP format.
Automatic Installation
3. Go to Plugins > Add New > Upload in your WordPress dashboard where you can browse to the checkout-ewayrapidapi.zip file and then click the “Install Now” button. Upon successful installation you will be given the option to activate the plugin immediately so you can click the “Activate Plugin” link and skip the upcoming activation instructions.
Manual Installation
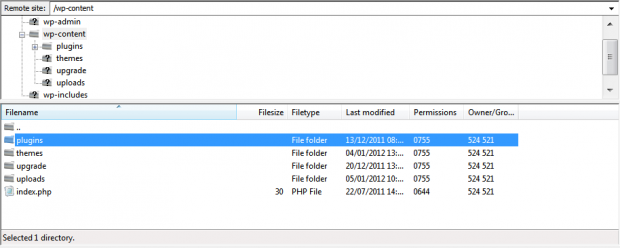
1. Extract the ZIP archive named checkout-ewayrapidapi.zip in order to be presented with a single folder named checkout-ewayrapidapi.
2. Upload the checkout-ewayrapidapi folder to the wp-content/plugins/ directory of your WordPress installation, as seen in the example image below. Follow the upcoming activation instructions to activate the eWAY Rapid API extension plugin.
Activation
Once you have installed the eWAY Rapid API extension via FTP you need to activate it.
To activate it you need to go to the normal Plugins > Installed Plugins section via your admin sidebar. There you will see the extension as a plugin listed amongst other plugins.
Once activated you will see it listed in the Checkout > Extensions section (via the “Checkout” menu item in the admin sidebar), as seen in this image below:

Configuration
Configure the eWAY Rapid API payment gateway integration under Checkout > Configuration > Payment Methods > eWAY Rapid API or alternatively under Checkout > Extensions > Settings > eWAY Rapid API.

Rapid API Settings
1. Title
Add a title for this payment gateway that will display on the front-end for the user.
2. API Key/ Username
When creating an account with eWAY Rapid API they will supply you an API Key/Username.
3. API Password
When creating an account with eWAY Rapid API they will supply you an API password.
4. Mode
Select your mode, are you using a live or sandbox account? The sandbox account will be for testing purposes.
Recurring Payment Settings
5. Customer ID
When creating an account with eWAY Rapid API they will supply you a customer ID.
6. MYeWAY Username
When creating an account with eWay Rapid API they will supply you a MYeWAY Username.
7. MYeWAY Password
When creating an account with eWay Rapid API they will supply you a MYeWAY password.
Setup a Sandbox account
- Log in to your partner portal account using the link below for your country
- Navigate to Resources > Sandbox/Testing and click on ‘Request Sandbox’ Note: Skip this step if you already have a Sandbox account
- Navigate to the Sandbox using the link below for your country
- Go to My Account > User Security > Manage Roles and complete the form.
- Go to My Account > User Security > Create User and complete the form. Note: You can use the same email address and password as your main Sandbox account.
- Click on ‘Actions’ next to the new user and ‘View API Key’. This is your new API key and password for accessing Rapid API.
- Note: In many Rapid 3.0 modules and sample code the API Key field is named as ‘Username’. You must use your API Key, not your Email address for Rapid 3.0.
Website & Email Hosting
Get the best website & email hosting for speed, security, and peace of mind. No restrictions. Freedom to do what you need in order to run your business.