Newsletters: Dyn Email Delivery SMTP

You can use Dyn Email Delivery with the WordPress Newsletter plugin to send out bulk emails.
1. What is Dyn Email Delivery?
Dyn Email Delivery is an SMTP email relay service by Dyn.
2. Set up Dyn Email with the Newsletter plugin
2.1. Add an approved sender
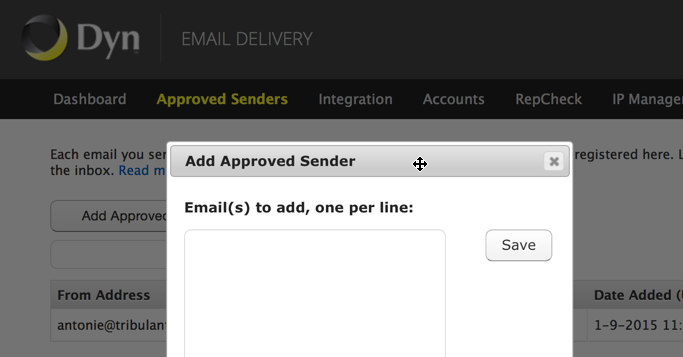
Go to your Dyn Email dashboard and click on “Approved Senders” in the menu. Then click on “Add Approved Sender” which will open a dialog where you can enter approved senders.
Enter the email which is configured in the Newsletter plugin as the “From Address” and if your “Bounce Receival Email” setting under Newsletters > Configuration > General > Bounce Configuration is different from the “From Address” setting, you need to approve the bounce email as well since it is considered as the sender.
With your approved senders added in Dyn Email, you can proceed to the next step.
2.2. Dyn Email SMTP credentials/settings
Dyn Email will provide you with the SMTP settings that you should use and there is some flexibility in the ports/protocols that you can use.
SMTP Host: smtp.dynect.net
SMTP Port: 25 or 255 or 1025
SMTP Port for SSL/TLS: 465 or 10465
SMTP Protocol: None or SSL or TLS
SMTP Username: Your Dyn Email username
SMTP Password: Your Dyn Email password
With the details above, you’ll be able to connect to the Dyn Email outgoing SMTP server and send emails.
You’ll notice that there are different ports and protocols. If you’re going to use SSL or TLS, be sure that you use port 465 or 10465. If you’re not going to use a secure protocol, just use port 25 or 255 or 10025.
2.3. Configure SMTP settings in the Newsletter plugin

Go to your WordPress dashboard and navigate to Newsletters > Configuration > General > General Mail Settings.
Set the “Mail Type” setting to “SMTP” which will reveal all the SMTP settings so that you can fill them in. Based on 2.2 above with the SMTP credentials/settings from Dyn Email, go ahead and fill in the relevant values.
When you’re done, you can click the blue “Test Email Settings” button below the SMTP settings to send a test email. When you click the button, the new settings will be used so you don’t have to save the configuration first.
3. Troubleshooting Dyn Email SMTP problems
If you are unable to send emails using the WordPress Newsletter plugin and Dyn Email SMTP, there could be several reasons for this. Here are some possible reasons:
3.1. 535 Incorrect authentication data
This error (or something similar) would indicate that either you don’t have permissions to send through Dyn Email or that the username/password combination that you filled in is incorrect. Please review your authentication settings.
3.2. Called Mail() without being connected
phpMailer in WordPress gives this error because it is trying to send the email but it isn’t actually connected to the Dyn Email SMTP server. In most cases, this error is due to a firewall on the hosting, preventing the outgoing PHP socket connection to the SMTP server. So please contact your hosting provider, giving them the host, port and protocol that you are using and ask them to open up the outgoing connection for that. Alternatively, it could be that the port and protocol combination that you entered is incorrect so just review those settings.
WordPress Plugins
Start selling products, sending newsletters, publishing ads, and more through your own WordPress website using our premium WordPress plugins.